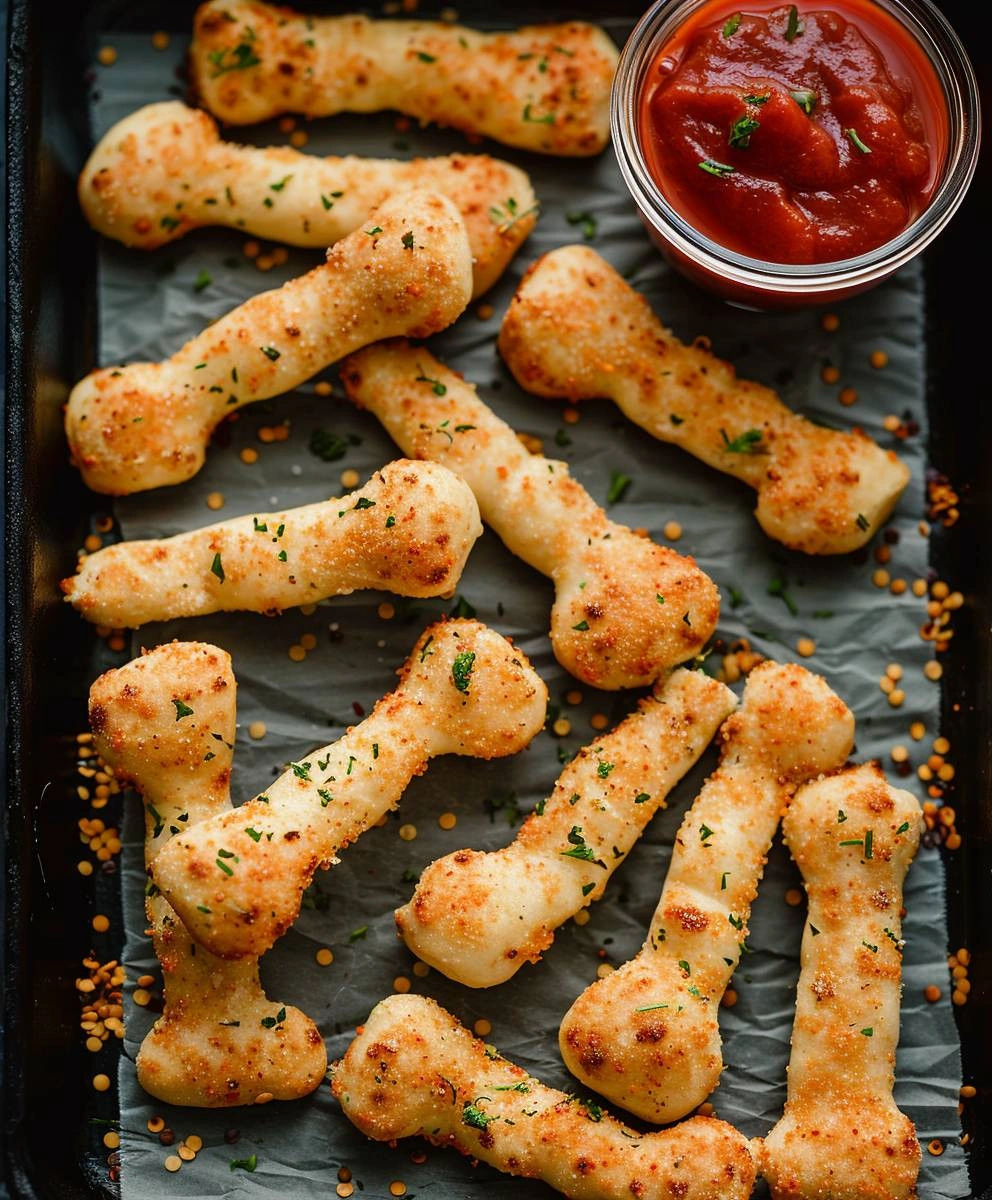
If you’re looking for a fun and tasty way to celebrate Halloween, you’ve come to the right place! These Halloween Breadsticks: Spooky & Delicious Recipe Ideas are not only delightful but also easy to make. They’re perfect for family gatherings, parties, or even just a cozy night in with your loved ones. With a little creativity, you can turn these simple breadsticks into festive treats that will have everyone smiling.
This recipe is special because it combines the joy of baking with the excitement of Halloween. Not only do they taste fantastic, but they can also be customized to fit your spooky theme. Let’s get started on this festive adventure!
Why You’ll Love This Recipe
- Easy to Prepare: With just a few simple steps, you’ll have delicious breadsticks ready in no time.
- Family-Friendly Fun: Kids will love helping to decorate these spooky snacks, making it a great bonding activity.
- Customizable Creations: Feel free to mix and match toppings to create unique designs that fit your Halloween theme.
- Perfect for Any Occasion: Whether it’s a party or a cozy family dinner, these breadsticks are sure to impress!
- Delicious Flavor: The combination of Parmesan cheese and fresh rosemary makes every bite irresistible.

Ingredients You’ll Need
Making these Halloween breadsticks is super easy with wholesome ingredients you probably already have at home! Here’s what you’ll need:
- 2 cups (250g) all-purpose flour, plus extra for dusting
- 1 teaspoon salt
- 1 teaspoon sugar
- 1 packet (2 1/4 teaspoons) active dry yeast
- 1 cup (240ml) warm water (105-115°F)
- 2 tablespoons olive oil
- 1 large egg, beaten
- 1/2 cup (60g) grated Parmesan cheese
- 1/4 cup (30g) finely chopped fresh rosemary
- 1/2 cup (60g) black olive slices
- 1/4 cup (30g) orange cheddar cheese, shredded
- 1/4 cup (30g) green bell pepper, finely chopped
- 1/4 cup (30g) red bell pepper, finely chopped
- Melted butter, for brushing
- Coarse sea salt, for sprinkling (optional)
Variations
One of the best parts about this recipe is how flexible it is! You can easily switch things up based on what you have on hand or your personal preferences. Here are some fun variations you might want to try:
- Add Some Spice: Mix in some crushed red pepper flakes into the dough for a little kick!
- Try Different Cheeses: Experiment with different cheeses like mozzarella or feta for unique flavors.
- Make Them Sweet: Swap out savory toppings for cinnamon sugar before baking for a sweet treat.
- Go Vegan: Replace the egg with a flaxseed egg and use vegan cheese alternatives.
How to Make Halloween Breadsticks: Spooky & Delicious Recipe Ideas
Step 1: Mix the Dry Ingredients
In a large bowl, whisk together the flour, salt, and sugar. This step is crucial because it helps evenly distribute all the dry ingredients before adding any wet ones. Making a well in the center allows room for our yeast mixture later.
Step 2: Activate the Yeast
In a small bowl, dissolve the yeast in warm water and let it stand until foamy—about 5 to 10 minutes. This step is important because it ensures that your yeast is alive and ready to help the dough rise!
Step 3: Combine Wet and Dry Ingredients
Pour the yeast mixture into your well in the flour mixture. Add olive oil and beaten egg next. This combination brings moisture and flavor to our dough.
Step 4: Form the Dough
Using a wooden spoon or your hands, gradually incorporate flour into the wet ingredients until you form a shaggy dough. It’s okay if it looks messy at first; we’ll knead it into shape shortly!
Step 5: Knead Until Smooth
Turn your shaggy dough onto a lightly floured surface and knead it for about 5–7 minutes until smooth and elastic. Kneading develops gluten, which gives our breadsticks structure.
Step 6: Let It Rise
Place your kneaded dough in an oiled bowl, turning it to coat all sides. Cover with plastic wrap and let it rise in a warm place until doubled—this usually takes about 1–1.5 hours.
Step 7: Shape Your Breadsticks
After punching down risen dough gently, roll it out on a floured surface until it’s about 1/4-inch thick. This thickness will give you nice chewy breadsticks!
Step 8: Cut into Strips
Using a pizza cutter or sharp knife, cut your rolled-out dough into strips about half an inch wide. Don’t worry too much about perfect shapes; this adds character!
Step 9: Decorate Your Breadsticks
Place them on parchment paper-lined baking sheets with space between each one. Now comes the fun part! Sprinkle them with Parmesan cheese and rosemary mix while adding black olive slices for eyes and other creative decorations.
Step 10: Final Rise
Let your decorated breadsticks rise again for another 15–20 minutes until they look slightly puffy—this helps them get that lovely airy texture when baked.
Step 11: Preheat Oven
While they’re rising, preheat your oven to 400°F (200°C). A hot oven is key to achieving those beautifully golden-brown breadsticks!
Step 12: Bake Your Breadsticks
Brush them with melted butter before sprinkling coarse sea salt on top if desired. Bake them for about 12–15 minutes or until they turn golden brown.
Step 13: Cool & Serve
Once baked, remove them from the oven and let cool slightly on a wire rack before serving. Enjoy these festive treats at your next gathering or simply as an evening snack!
With these Halloween Breadsticks: Spooky & Delicious Recipe Ideas, you’re all set for an unforgettable celebration! Happy baking!
Pro Tips for Making Halloween Breadsticks: Spooky & Delicious Recipe Ideas
Making Halloween breadsticks can be a fun and rewarding experience, and these tips will help you achieve the best results!
-
Use fresh yeast: Ensuring your yeast is active not only helps the dough rise properly, but it also contributes to a better texture and flavor in your breadsticks. If it doesn’t foam after dissolving, try a new packet.
-
Don’t rush the rising process: Allowing your dough to rise until doubled in size ensures that your breadsticks are light and fluffy. A warm, draft-free environment is ideal for this step.
-
Experiment with shapes: Get creative with how you cut and shape your breadsticks! Twisting them or making them into fun Halloween-themed shapes can add a festive touch that’s sure to delight.
-
Customize toppings: Feel free to switch up the toppings based on what you have at home or what flavors you love. For instance, adding garlic powder or using different cheeses can create unique variations.
-
Serve warm: Serving these breadsticks warm enhances their flavor and texture. You can reheat any leftovers in the oven for a few minutes to bring back their freshly baked goodness.
How to Serve Halloween Breadsticks: Spooky & Delicious Recipe Ideas
Presentation is key when it comes to serving these spooky delights! Here are some creative ways to elevate your Halloween breadstick experience.
Garnishes
- Fresh herbs: Sprinkling chopped parsley or chives on top adds a pop of color and freshness that complements the savory flavors.
- Olive oil drizzle: A light drizzle of high-quality olive oil before serving not only enhances flavor but also gives your breadsticks an inviting sheen.
Side Dishes
- Pumpkin soup: The rich and creamy texture of pumpkin soup makes for a perfect companion, providing warmth and comfort alongside your spooky breadsticks.
- Roasted vegetables: A mix of seasonal roasted veggies like carrots, squash, and Brussels sprouts brings a delightful contrast in taste and texture.
- Crispy salad: A light arugula or spinach salad with a tangy vinaigrette offers freshness that balances the richness of the breadsticks.
- Spooky dip platter: Serve with hummus or guacamole decorated with edible eyes made from olives for an extra fun touch!
These serving suggestions will not only enhance the visual appeal of your dish but also create a delightful dining experience that’s perfect for any Halloween gathering. Enjoy making memories as you share these spooky treats with friends and family!
Make Ahead and Storage
These Halloween breadsticks are not only fun to make but also perfect for meal prep! You can easily whip them up in advance for parties or get-togethers, ensuring you have a delightful snack ready to go.
Storing Leftovers
- Place leftover breadsticks in an airtight container.
- Store them at room temperature for up to 2 days.
- For longer storage, keep them in the refrigerator for up to a week.
Freezing
- Allow baked breadsticks to cool completely.
- Wrap each breadstick tightly in plastic wrap or aluminum foil.
- Place wrapped breadsticks in a freezer-safe bag or container. They can be frozen for up to 3 months.
Reheating
- Preheat your oven to 350°F (175°C).
- Unwrap frozen breadsticks and place them on a baking sheet.
- Bake for about 10-15 minutes until warmed through and crispy.
FAQs
Here are some commonly asked questions about these festive treats!
Can I customize my Halloween Breadsticks: Spooky & Delicious Recipe Ideas?
Absolutely! Feel free to get creative with toppings and decorations. You can use different cheeses, herbs, or even add spooky shapes using cookie cutters before baking.
How do I make Halloween Breadsticks: Spooky & Delicious Recipe Ideas gluten-free?
To make this recipe gluten-free, substitute all-purpose flour with a gluten-free flour blend. Ensure that the yeast is also gluten-free. Follow the same instructions, and enjoy your spooky snacks!
What can I serve with Halloween breadsticks?
These breadsticks pair wonderfully with marinara sauce, garlic butter, or even a spooky-themed dip. They make a great addition to any party platter!
Final Thoughts
I hope you find joy in making these delightful Halloween breadsticks! They are not only a treat for the taste buds but also a fantastic way to bring some festive fun to your gatherings. Enjoy crafting your spooky creations, and don’t forget to share your experiences with loved ones. Happy baking!
Halloween Breadsticks: Spooky & Delicious Recipe Ideas

- Prep Time: 20 minutes
- Cook Time: 15 minutes
- Total Time: 35 minutes
- Category: Main
- Method: Cooking
- Cuisine: International
Ingredients
- 2 cups all-purpose flour
- 1 teaspoon salt
- 1 teaspoon sugar
- 1 packet active dry yeast (2 1/4 teaspoons)
- 1 cup warm water (105-115°F)
- 2 tablespoons olive oil
- 1 large egg, beaten
- 1/2 cup grated Parmesan cheese
- 1/4 cup finely chopped fresh rosemary
- 1/2 cup black olive slices
- Optional toppings: orange cheddar cheese, green and red bell peppers
- Instructions:
Instructions
- In a large bowl, whisk together flour, salt, and sugar.
- In a small bowl, dissolve yeast in warm water; let stand until foamy (5–10 minutes).
- Pour the yeast mixture into the well of the flour mixture; add olive oil and beaten egg.
- Mix until a shaggy dough forms; knead on a floured surface for about 5–7 minutes until smooth.
- Place dough in an oiled bowl; cover and let rise in a warm place until doubled (1–1.5 hours).
- Roll out dough to about 1/4-inch thick; cut into strips.
- Decorate with toppings; let rise again for another 15–20 minutes.
- Preheat oven to 400°F; bake for 12–15 minutes until golden brown.
- Helpful Notes:
Nutrition
- Serving Size: 1 breadstick (40g)
- Calories: 130
- Sugar: 0g
- Sodium: 200mg
- Fat: 4g
- Saturated Fat: 1g
- Unsaturated Fat: 3g
- Trans Fat: 0g
- Carbohydrates: 22g
- Fiber: 0.5g
- Protein: 4g
- Cholesterol: 20mg

Leave a Comment