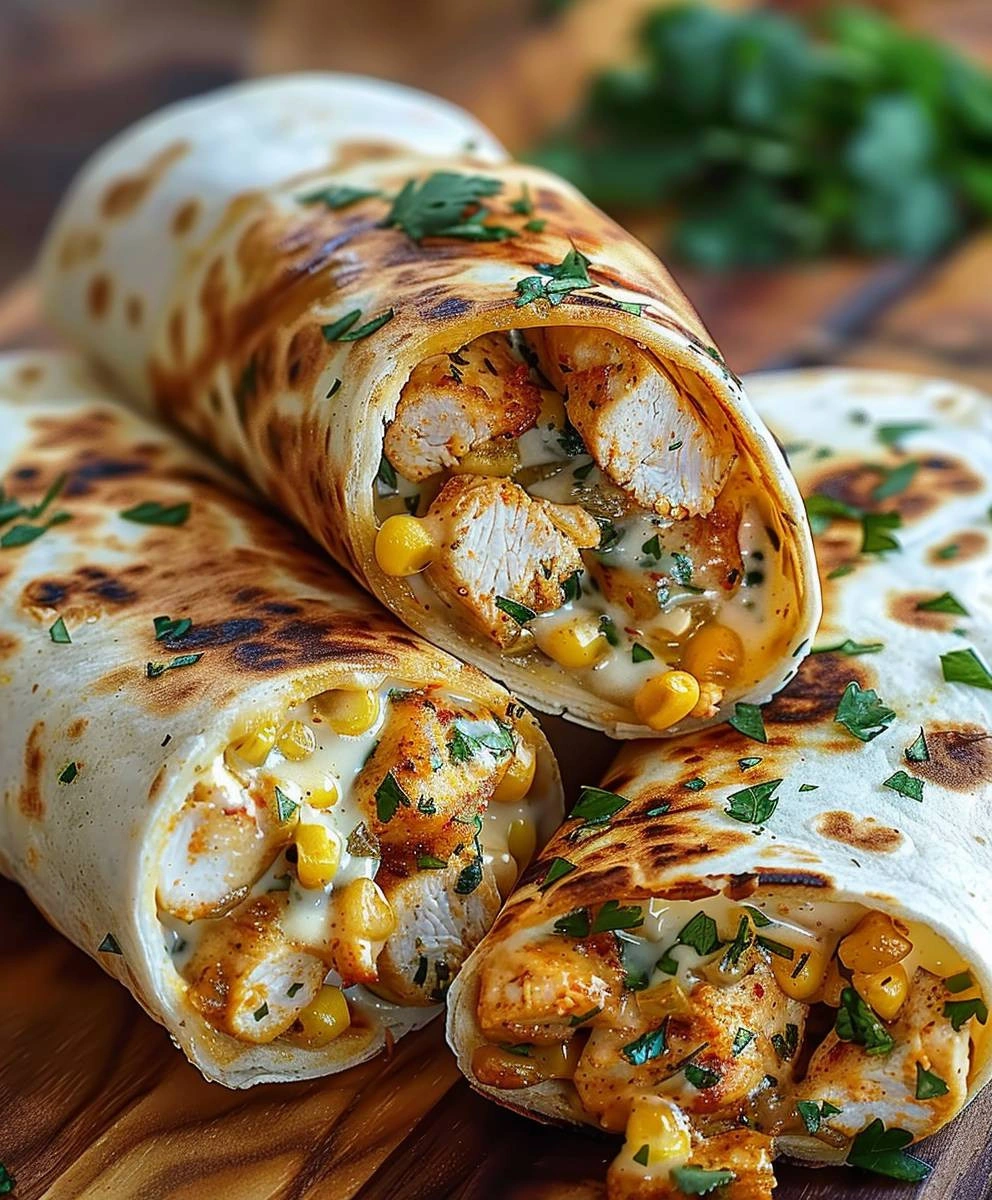
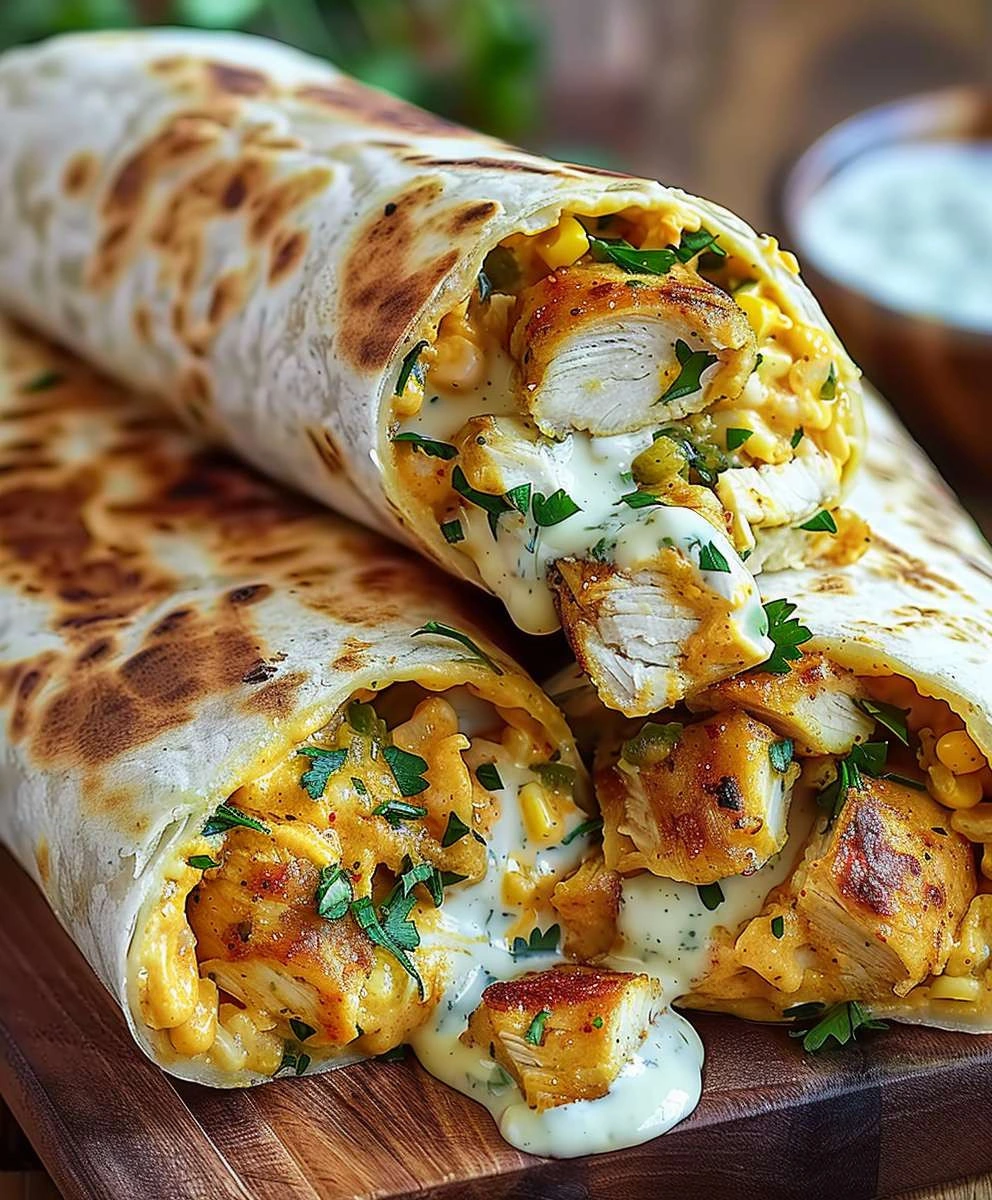
If you’re looking for a delicious and easy meal that the whole family will love, let me introduce you to my favorite dish: Cheesy Garlic Chicken Wraps: A Simple Recipe. These wraps are creamy, cheesy, and bursting with flavor, making them perfect for busy weeknights or even as a fun appetizer for gatherings. Honestly, there’s something so delightful about biting into a warm wrap filled with cheesy goodness and tender chicken—it’s comfort food at its finest!
What makes this recipe extra special is how quick it comes together. With just a few simple ingredients, you can create a meal that feels indulgent without spending hours in the kitchen. Whether you’re feeding a crowd or just treating yourself after a long day, these wraps are sure to become a go-to favorite.
Why You’ll Love This Recipe
- Quick Preparation: This recipe takes only about 35 minutes from start to finish, making it ideal for those hectic evenings.
- Family-Friendly Appeal: Kids and adults alike adore cheesy flavors, so everyone will be happy at the dinner table!
- Make-Ahead Convenience: You can prep the filling ahead of time and store it in the fridge, making assembly a breeze later on.
- Delicious Flavor: The combination of garlic and cheese creates an irresistible taste that will have everyone coming back for seconds.
Ingredients You’ll Need
Let’s gather some simple and wholesome ingredients that make these cheesy garlic chicken wraps so irresistible! You’ll likely find most of these in your pantry or fridge already.
For the Chicken Filling
- 1.5 lbs boneless, skinless chicken breasts, cut into bite-sized pieces
- 1 tbsp olive oil
- 2 cloves garlic, minced
- 1 tsp dried oregano
- 1/2 tsp dried basil
- 1/4 tsp salt
- 1/4 tsp black pepper
For the Cheesy Mixture
- 1 cup shredded mozzarella cheese
- 1/2 cup shredded Parmesan cheese
- 1/4 cup grated Romano cheese (optional)
- 1/4 cup butter, melted
For Wrapping
- 10 large flour tortillas (burrito size)
For Serving (Optional)
- 1/2 cup sour cream
- 1/4 cup chopped fresh parsley
Variations
One of the best things about Cheesy Garlic Chicken Wraps is how flexible they are! You can easily customize them to fit your taste preferences or dietary needs.
- Swap the protein: Try using turkey or grilled vegetables instead of chicken for a lighter option.
- Add some heat: Toss in some diced jalapeños or sprinkle red pepper flakes into the cheesy mixture for an extra kick!
- Go gluten-free: Use gluten-free tortillas to make this dish suitable for gluten-sensitive friends and family.
- Mix up the cheese: Feel free to experiment with different cheeses like cheddar or pepper jack for unique flavors.
How to Make Cheesy Garlic Chicken Wraps: A Simple Recipe
Step 1: Prepare the Chicken
Start by cutting your chicken breasts into bite-sized pieces. This helps them cook evenly and ensures every bite is packed with flavor. In a large bowl, toss your chicken pieces with olive oil, minced garlic, oregano, basil, salt, and pepper until everything is well-coated.
Step 2: Cook the Chicken
Heat a large skillet over medium-high heat. Add your seasoned chicken and cook it while stirring occasionally until fully cooked and browned—this should take about 8-10 minutes. If you have a lot of chicken, feel free to work in batches to avoid overcrowding the pan.
Step 3: Make It Cheesy
Once your chicken is cooked through, remove it from the skillet and set it aside. In that same skillet (no need to wash it!), melt butter over medium heat. Add mozzarella, Parmesan, and Romano cheese if you’re using it. Stir constantly until everything is melted and smooth—this usually takes around 2-3 minutes.
Step 4: Combine It All
Now it’s time to bring everything together! Stir in the cooked chicken until it’s evenly coated with that luscious cheesy mixture. Remove from heat and let it cool slightly while you warm up your tortillas.
Step 5: Assemble Your Wraps
Warm your tortillas either by microwaving them for about 10-15 seconds or heating them in a dry skillet. Spoon generous portions of the cheesy chicken mixture onto each tortilla’s center. Fold the sides inward first, then roll up tightly from the bottom for secure wrapping.
Step 6: Final Touches
If you’d like an extra touch of flavor, brush your wraps with some additional melted butter before serving. Serve them warm alongside sour cream for dipping and garnish with freshly chopped parsley if desired.
And there you have it—delicious Cheesy Garlic Chicken Wraps ready to enjoy! They’re great right away but also keep well in the refrigerator for up to two days if you happen to have leftovers (which I doubt!). Enjoy this scrumptious dish any night of the week!
Pro Tips for Making Cheesy Garlic Chicken Wraps: A Simple Recipe
Making these cheesy garlic chicken wraps can be a breeze with just a few helpful tips!
-
Prep Ahead: Chop your chicken and prep the seasonings in advance. This not only saves you time during cooking but also allows the flavors to meld beautifully.
-
Use High Heat: Cooking the chicken over medium-high heat helps achieve that perfect golden-brown color and crispy texture. It seals in moisture, making each bite juicy.
-
Experiment with Cheese: While mozzarella and Parmesan are classic choices, feel free to mix in your favorite cheeses or even add a bit of spicy pepper jack for an extra kick!
-
Don’t Overfill Your Wraps: It might be tempting to load them up, but keeping the filling moderate ensures that your wraps roll easily and don’t fall apart when you dig in.
-
Reheat with Care: If you have leftovers, reheat them in the oven instead of the microwave. This keeps them crispy on the outside while warming the cheesy filling perfectly.
How to Serve Cheesy Garlic Chicken Wraps: A Simple Recipe
Presenting these cheesy garlic chicken wraps can make mealtime even more enjoyable! Here are some ideas to elevate your serving experience.
Garnishes
- Chopped Fresh Parsley: A sprinkle of fresh parsley adds a pop of color and a hint of freshness that complements the richness of the dish.
- Sliced Green Onions: These add a mild onion flavor and vibrant color, making your wraps look as good as they taste.
Side Dishes
-
Crispy Mixed Greens Salad: A light salad with mixed greens, cherry tomatoes, and a tangy vinaigrette provides a refreshing contrast to the warm wraps.
-
Roasted Vegetables: A mix of seasonal vegetables like bell peppers, zucchini, and carrots roasted until tender makes for a delightful side that’s both healthy and colorful.
-
Spanish Rice: Fluffy Spanish rice seasoned with spices is an excellent companion to these wraps, adding a hearty touch to your meal.
-
Guacamole: Creamy guacamole brings a smooth texture and rich flavor that pairs wonderfully with the cheesy wraps—perfect for dipping!
With these tips and serving suggestions, you’re all set to enjoy delicious cheesy garlic chicken wraps any night of the week!
Make Ahead and Storage
These Cheesy Garlic Chicken Wraps are perfect for meal prep! You can easily make them ahead of time, ensuring you have a delicious option ready for busy days. Here’s how to store, freeze, and reheat your wraps.
Storing Leftovers
- Allow the wraps to cool completely at room temperature.
- Place them in an airtight container.
- Store in the refrigerator for up to 2 days.
Freezing
- Wrap each individual cheesy garlic chicken wrap tightly in plastic wrap or aluminum foil.
- Place wrapped wraps in a freezer-safe bag or container.
- They can be frozen for up to 3 months.
Reheating
- For refrigerated wraps, preheat your oven to 350°F (175°C).
- Place wraps on a baking sheet and cover with foil. Heat for about 15-20 minutes until warmed through.
- For frozen wraps, thaw in the refrigerator overnight before reheating, or microwave on low power until heated thoroughly.
FAQs
Here are some common questions about making Cheesy Garlic Chicken Wraps:
Can I customize the filling in these Cheesy Garlic Chicken Wraps?
Absolutely! Feel free to add vegetables like bell peppers or spinach, or switch out the cheeses based on your preference.
How do I keep my Cheesy Garlic Chicken Wraps from getting soggy?
To prevent sogginess, ensure the chicken mixture has cooled before assembling the wraps. Additionally, you can layer some lettuce inside to create a barrier between the filling and tortilla.
Can I use gluten-free tortillas for this recipe?
Yes! Just substitute regular flour tortillas with gluten-free options available at most grocery stores.
Are these Cheesy Garlic Chicken Wraps suitable for kids?
Definitely! The cheesy flavor and fun wrap format make them appealing for kids. Plus, they’re easy to hold and eat!
Final Thoughts
I hope you enjoy making these Cheesy Garlic Chicken Wraps as much as I do! They’re not only delicious but also versatile and perfect for any occasion. Whether you’re whipping them up for a quick weeknight dinner or serving them at a gathering, they’re sure to be a hit. Enjoy every cheesy bite and don’t hesitate to get creative with your fillings. Happy cooking!
Cheesy Garlic Chicken Wraps: A Simple Recipe

- Prep Time: 15 minutes
- Cook Time: 20 minutes
- Total Time: 35 minutes
- Category: Main
- Method: Cooking
- Cuisine: International
Ingredients
- 1.5 lbs boneless, skinless chicken breasts
- 1 tbsp olive oil
- 2 cloves garlic
- 1 cup shredded mozzarella cheese
- 1/2 cup shredded Parmesan cheese
- 10 large flour tortillas
- Instructions:
Instructions
- Cut chicken into bite-sized pieces and toss with olive oil, minced garlic, oregano, basil, salt, and pepper.
- Cook seasoned chicken in a skillet over medium-high heat for 8-10 minutes until browned and fully cooked.
- Remove chicken and melt butter in the same skillet. Add mozzarella and Parmesan cheese; stir until melted.
- Combine cooked chicken with the cheese mixture.
- Warm tortillas and fill each with the cheesy chicken mixture, rolling them up tightly.
- Serve warm with optional sour cream and chopped parsley.
- Helpful Notes:
Nutrition
- Serving Size: 1 wrap (160g)
- Calories: 380
- Sugar: 2g
- Sodium: 640mg
- Fat: 22g
- Saturated Fat: 10g
- Unsaturated Fat: 10g
- Trans Fat: 0g
- Carbohydrates: 28g
- Fiber: 2g
- Protein: 20g
- Cholesterol: 90mg

Leave a Comment