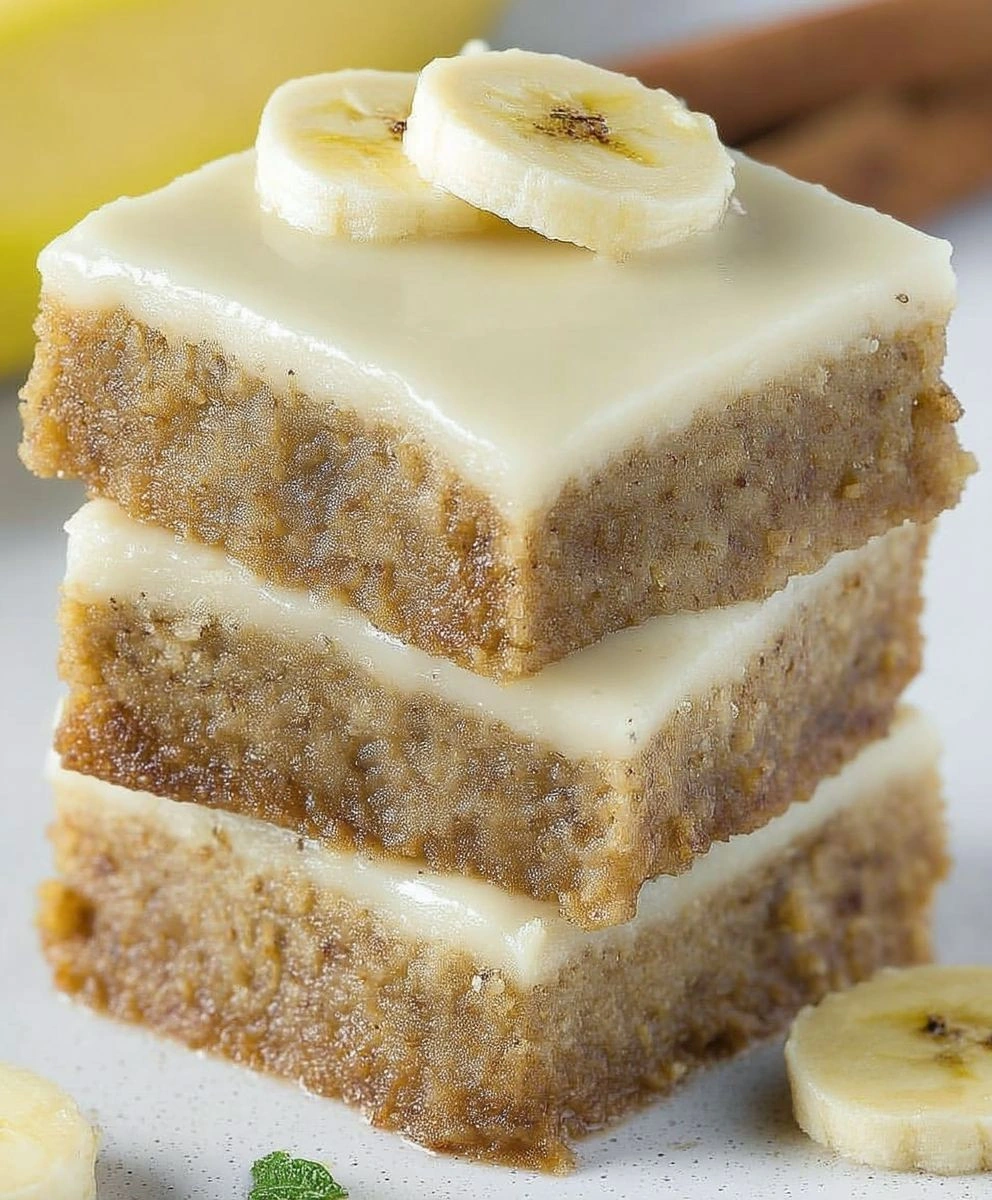
If you’re looking for a treat that’s both comforting and indulgent, you’ve come to the right place! These Banana Bread Blondies are not just your average dessert; they are the ultimate guide to baking delicious treats that will make your taste buds dance! With their chewy texture and rich brown butter glaze, they’re perfect for busy weeknights or family gatherings. Plus, they’re super easy to whip up, making them a favorite in my kitchen.
There’s something so special about baking with ripe bananas. They add natural sweetness and moisture that truly elevate these blondies. Whether you’re serving them at a potluck or enjoying them with your morning coffee, these blondies are sure to become a staple in your home!
Why You’ll Love This Recipe
- Quick and Easy: You can have these blondies ready in under an hour! Perfect for those last-minute dessert cravings.
- Family-Friendly: Kids and adults alike will love the combination of banana flavor and gooey chocolate.
- Make-Ahead Convenience: Bake a batch ahead of time, and enjoy them throughout the week—if they last that long!
- Customizable Add-Ins: Feel free to mix it up with your favorite nuts, chocolate chips, or sprinkles for decoration.
- Deliciously Satisfying: The rich brown butter glaze takes these blondies to another level of yum!

Ingredients You’ll Need
You’ll be thrilled to know that the ingredients for these Banana Bread Blondies are simple and wholesome. Most of them are likely already in your pantry! Here’s what you’ll need:
For the Blondies
- 1 cup (2 sticks) unsalted butter, melted
- 1 ½ cups packed light brown sugar
- 2 large eggs
- 1 teaspoon vanilla extract
- 1 cup mashed ripe bananas (about 2-3 medium bananas)
- 2 cups all-purpose flour
- 1 teaspoon baking powder
- ½ teaspoon baking soda
- ½ teaspoon salt
- ½ cup chopped walnuts or pecans (optional)
For the Brown Butter Glaze
- 4 tablespoons (½ stick) unsalted butter
- 2 cups powdered sugar
- 3-4 tablespoons milk or heavy cream
- ½ teaspoon vanilla extract
- Pinch of salt
For Extra Flavor
- ½ cup chocolate chips (milk, dark, or semi-sweet)
- ½ cup toffee bits
- Sprinkles for decoration
Variations
This recipe is wonderfully flexible! Feel free to get creative with different flavors and textures. Here are a few ideas:
- Add Spices: Spice things up by adding cinnamon or nutmeg for extra warmth.
- Swap Nuts: Use other nuts like almonds or skip them altogether if you’re nut-free!
- Go Tropical: Add shredded coconut for a tropical twist that pairs well with bananas.
- Fruit Swaps: Try mixing in other fruits like blueberries or strawberries for a fresh take.
How to Make Banana Bread Blondies: The Ultimate Guide to Baking Delicious Treats
Step 1: Melt the Butter
Start by melting the butter in a microwave-safe bowl or over low heat on the stove. Let it cool slightly afterward. Melting the butter not only makes mixing easier but also helps create those lovely chewy blondies.
Step 2: Mix Butter and Sugar
In a large bowl, whisk together the melted butter and packed light brown sugar until smooth. This step is essential as it combines two key ingredients that will give your blondies their delightful sweetness and texture.
Step 3: Add Eggs and Vanilla
Beat in the eggs one at a time, then stir in the vanilla extract. This adds richness and flavor to our batter—don’t skip this part!
Step 4: Incorporate Bananas
Next, fold in your mashed ripe bananas until everything is just combined. Bananas lend moisture and sweetness, making these blondies irresistibly delicious.
Step 5: Combine Dry Ingredients
In another bowl, whisk together the flour, baking powder, baking soda, and salt. Mixing dry ingredients separately helps ensure even distribution throughout the batter.
Step 6: Mix Wet and Dry Ingredients
Gradually add the dry mixture into the wet ingredients while mixing gently. Remember—overmixing can lead to tough blondies!
Step 7: Add Optional Mix-Ins
Fold in any optional ingredients like nuts, chocolate chips, or toffee bits at this point. These add-ins give our blondies extra flavor bursts!
Step 8: Prepare Your Baking Pan
Preheat your oven to 350°F (175°C). Grease and flour a 9×13 inch baking pan or line it with parchment paper. Proper preparation prevents sticking and helps achieve those perfect edges.
Step 9: Pour Batter into Pan
Pour your batter into the prepared pan and spread it evenly using a spatula. This ensures even cooking throughout.
Step 10: Bake to Perfection
Bake for about 25-30 minutes until you see lightly golden edges and a toothpick comes out with moist crumbs attached. Keep an eye on them towards the end; no one likes overbaked blondies!
Step 11: Cool Completely
Allow your blondies to cool completely in the pan before frosting. Patience is key here; we want that glaze to set just right!
Step 12: Make Brown Butter Glaze
In a light-colored saucepan over medium heat, melt additional butter until it turns a nutty brown color with an amazing aroma—this is where all that flavor comes from! Remove from heat and let it cool slightly.
Step 13: Whisk Together Glaze Ingredients
In a medium bowl, whisk together powdered sugar, cooled brown butter, milk/cream, vanilla extract, and salt until smooth. Start with less milk/cream; you can always add more if needed.
Step 14: Adjust Consistency
Adjust your glaze consistency by adding more powdered sugar if too thin or more milk if too thick—it should be pourable but not runny.
Step 15: Frost Your Blondies
Once cooled completely, pour that luscious brown butter glaze over your blondies! Spread it evenly across the top for perfect coverage.
Step 16: Decorate with Sprinkles
If you’re feeling festive—or just want some extra flair—add sprinkles on top of the glaze!
Step 17: Cut into Squares
Now it’s time to cut them into squares. Enjoying these fresh out of the oven is a must!
Step 18: Store Leftovers
Store any leftovers in an airtight container at room temperature for up to three days or refrigerate for up to a week—if they last that long!
With each bite of these Banana Bread Blondies drizzled with rich brown butter glaze, you’re going to fall head over heels! Happy baking!
Pro Tips for Making Banana Bread Blondies: The Ultimate Guide to Baking Delicious Treats
Baking can feel like a science experiment, but with these tips, you’ll be set up for success in no time!
-
Use ripe bananas – The riper the bananas, the sweeter and more flavorful your blondies will be. Look for bananas with plenty of brown spots; this indicates they are perfect for baking.
-
Don’t overmix the batter – Mixing just until combined ensures your blondies will have that chewy texture we all love. Overmixing can lead to tough blondies, so embrace those lumps!
-
Check for doneness early – Ovens can vary, so start checking your blondies a few minutes before the suggested baking time. A toothpick should come out with a few moist crumbs for the perfect gooey center.
-
Cool completely before frosting – Allowing your blondies to cool fully ensures that the glaze sets nicely and doesn’t slide off. Plus, it makes them easier to cut into neat squares!
-
Experiment with mix-ins – While walnuts and chocolate chips are classic choices, feel free to try different add-ins like dried fruit or coconut flakes for a unique twist on this delicious treat.
How to Serve Banana Bread Blondies: The Ultimate Guide to Baking Delicious Treats
Presenting your banana bread blondies can make all the difference in impressing family and friends! Here are some fun ideas to elevate your serving game.
Garnishes
- Chopped nuts – Sprinkle chopped walnuts or pecans over the top of the glazed blondies for added crunch and flavor.
- Chocolate drizzle – Drizzling melted chocolate on top adds an extra layer of sweetness and visual appeal that’s hard to resist.
- Fresh banana slices – Add a few slices of fresh banana on top just before serving for a lovely touch that complements the flavors beautifully.
Side Dishes
- Vanilla ice cream – A scoop of creamy vanilla ice cream pairs wonderfully with warm blondies, creating a delightful contrast in temperature and texture.
- Fresh fruit salad – A light fruit salad made with berries or citrus fruits provides a refreshing balance to the sweetness of the blondies.
- Whipped coconut cream – For a dairy-free option, serve with whipped coconut cream. It adds a luscious texture without overwhelming flavors.
- Coffee or tea – A warm cup of coffee or herbal tea is the perfect beverage pairing. The warmth of the drink enhances the comforting flavors of these sweet treats.
With these serving suggestions and pro tips, you’re all set to enjoy your banana bread blondies like never before! Happy baking!
Make Ahead and Storage
These Banana Bread Blondies are perfect for meal prep! You can easily whip up a batch ahead of time, making them a delightful treat to have on hand whenever the craving strikes.
Storing Leftovers
- Store the blondies in an airtight container at room temperature for up to 3 days.
- For longer freshness, keep them in the refrigerator for up to a week.
Freezing
- Allow the blondies to cool completely before freezing.
- Wrap individual pieces tightly in plastic wrap, then place them in a freezer-safe bag or container.
- They can be frozen for up to 3 months.
Reheating
- To enjoy warm blondies, simply microwave them for about 10-15 seconds.
- If thawing from frozen, let them sit at room temperature for about 30 minutes before reheating.
FAQs
Here are some common questions that might come up while making your Banana Bread Blondies.
Can I use whole wheat flour instead of all-purpose flour in my Banana Bread Blondies?
Absolutely! Whole wheat flour can be substituted, but keep in mind that it may result in a denser texture. Adjust the baking time slightly if needed.
What makes this recipe the ultimate guide to baking delicious Banana Bread Blondies?
This recipe combines simple ingredients with easy-to-follow steps, ensuring that even novice bakers can create soft, chewy blondies packed with banana flavor and topped with a rich brown butter glaze.
Can I make these Banana Bread Blondies gluten-free?
Yes! You can substitute all-purpose flour with a gluten-free flour blend. Just ensure it’s a one-to-one replacement for best results.
How can I enhance the flavor of my Banana Bread Blondies?
You can add spices like cinnamon or nutmeg to amplify the flavor. Additionally, incorporating dark chocolate chips or dried fruits can give your blondies an exciting twist!
Final Thoughts
I hope you find joy in baking these delightful Banana Bread Blondies! Their soft texture and rich flavor make them truly special—perfect for sharing with friends or enjoying on your own. Don’t hesitate to get creative with your add-ins and toppings. Happy baking, and I can’t wait to hear how yours turn out!
Banana Bread Blondies: The Ultimate Guide to Baking Delicious Treats
- Prep Time: 15 minutes
- Cook Time: 30 minutes
- Total Time: 45 minutes
- Yield: 12 servings
- Category: Main
- Method: Cooking
- Cuisine: International
Ingredients
- Unsalted butter
- Light brown sugar
- Eggs
- Mashed ripe bananas
- All-purpose flour
- Baking powder
- Baking soda
- Salt
- Optional: Chopped walnuts or pecans, chocolate chips, toffee bits
- Preparation Instructions:
Instructions
- Preheat oven to 350°F (175°C) and grease a 9×13 inch baking pan.
- Melt the butter and let it cool slightly.
- Whisk together melted butter and brown sugar until smooth.
- Beat in eggs one at a time, then stir in vanilla extract.
- Fold in mashed bananas until just combined.
- In another bowl, mix flour, baking powder, baking soda, and salt.
- Gradually combine dry ingredients into wet ingredients without overmixing.
- Fold in optional mix-ins like nuts or chocolate chips if desired.
- Pour the batter into the prepared pan and spread evenly.
- Bake for 25-30 minutes until lightly golden; check with a toothpick for doneness.
- Cool completely before frosting with brown butter glaze.
- Helpful Notes:
Nutrition
- Serving Size: 1 serving
- Calories: 200
- Sugar: 15g
- Sodium: 110mg
- Fat: 9g
- Saturated Fat: 5g
- Unsaturated Fat: 3g
- Trans Fat: 0g
- Carbohydrates: 28g
- Fiber: 1g
- Protein: 2g
- Cholesterol: 30mg

Leave a Comment