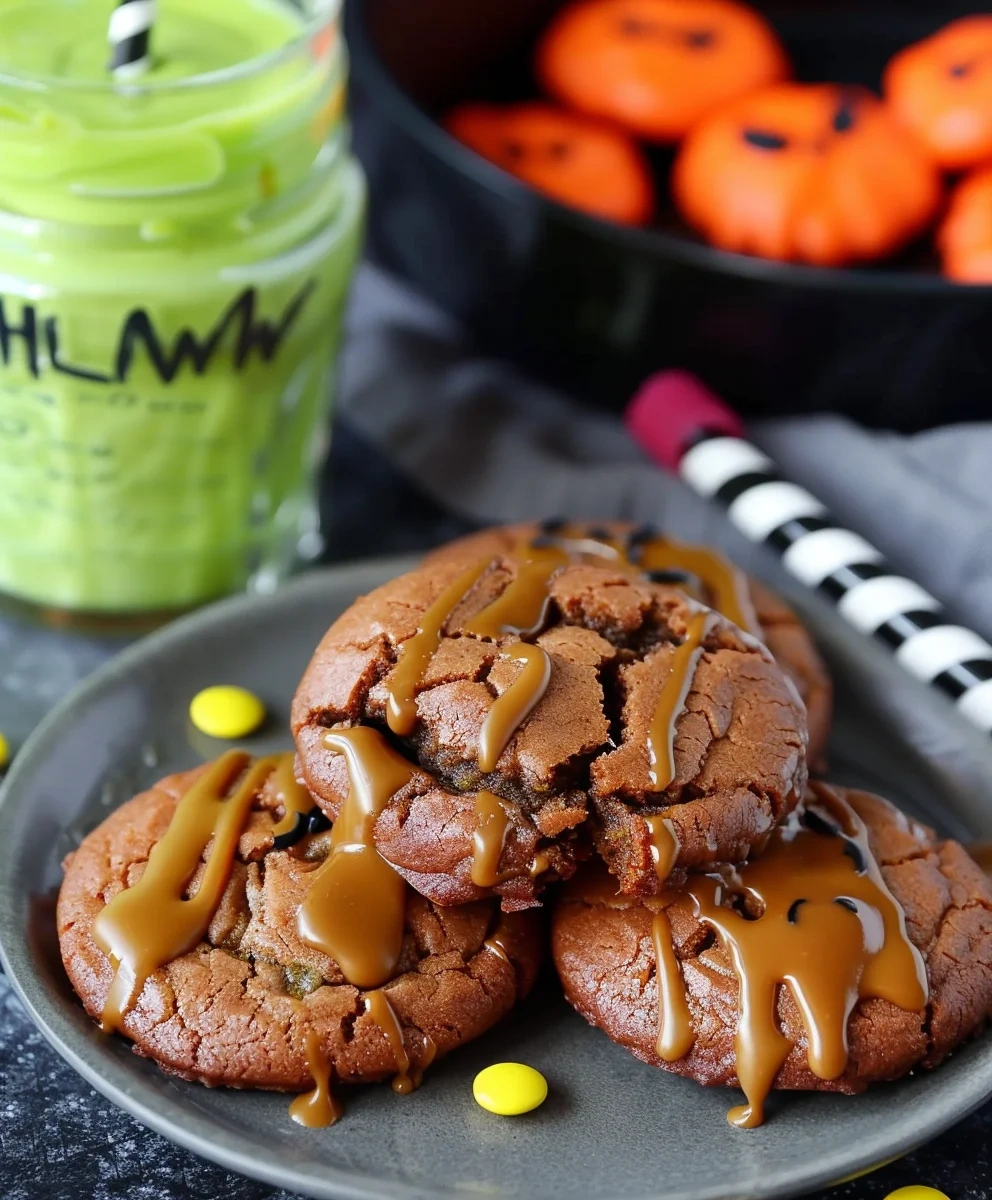
If you’re looking for a delightful way to celebrate Halloween, you’ve come to the right place! These Halloween Cookies are not just a treat; they’re an experience. Imagine gathering your loved ones in the kitchen, rolling out dough, and decorating cookies that are as fun to make as they are to eat. This recipe has become a favorite in my home because it combines the rich flavor of chocolate with colorful decorations that capture the festive spirit of the season. Plus, they’re perfect for parties, school events, or simply enjoying on a cozy evening at home.
What makes these Halloween Cookies truly special is how easy and enjoyable they are to decorate. You can let your creativity shine with vibrant green frosting and a sprinkle of M&M candies. They also make for great gifts or party favors, filling your home with warmth and cheer.
Why You’ll Love This Recipe
- Quick to prepare: With simple ingredients and straightforward steps, you’ll have these cookies ready in no time.
- Family-friendly fun: This recipe is perfect for kids and adults alike—everyone can get involved in the decorating!
- Make-ahead convenience: Prepare the dough in advance, chill it, and bake when you’re ready. It’s stress-free baking!
- Deliciously chocolatey: The combination of sugar cookies with cocoa creates a sweet treat that’s hard to resist.
- Festive designs: The bright colors and playful shapes will make any gathering feel extra special.

Ingredients You’ll Need
To whip up these delightful Halloween Cookies, you’ll need some simple and wholesome ingredients that you probably already have at home. Let’s gather what you’ll need!
For the Cookies
- 1 cup unsalted butter, softened
- 3/4 cup granulated sugar
- 2/3 cup packed brown sugar
- 2 large eggs
- 1 tsp vanilla extract
- 2 1/4 cups all-purpose flour
- 2/3 cup unsweetened cocoa powder
- 1 tsp baking soda
- 1/4 tsp salt
For the Decoration
- 16 oz white frosting (store-bought)
- 5 drops neon green gel food coloring
- M&M candies (orange, green, and purple)
Variations
This Halloween Cookies recipe is flexible enough for some fun twists! Here are a few ideas to switch things up:
- Add sprinkles: Top your cookies with festive sprinkles before the frosting sets for extra color and texture.
- Use different colors: Swap out the neon green frosting for other fun colors like purple or orange to match your theme!
- Try different shapes: Use cookie cutters in various Halloween shapes like bats or ghosts for added variety.
- Mix in flavors: Add a teaspoon of peppermint extract to the dough for a refreshing twist that’s perfect for fall.
How to Make Halloween Cookies
Step 1: Prepare Dry Ingredients
In a medium bowl, whisk together the all-purpose flour, unsweetened cocoa powder, baking soda, and salt. This step helps ensure that all dry ingredients are evenly distributed throughout your cookie dough.
Step 2: Cream Butter and Sugars
In a large bowl, beat the softened unsalted butter on medium speed until creamy. Gradually add in both sugars—granulated and brown—beating for about 2-3 minutes until light and fluffy. Scraping down the sides of your bowl ensures every bit of butter is well mixed!
Step 3: Add Eggs and Vanilla
Now it’s time to mix things up! Beat in each egg one at a time along with the vanilla extract until just combined. This helps keep your cookie dough light without overmixing.
Step 4: Combine Wet and Dry Ingredients
With your mixer on low speed, gradually incorporate the dry mixture into the wet ingredients in thirds. Mix only until no streaks of flour remain; this prevents tough cookies.
Step 5: Chill the Dough
Divide your dough into two equal portions. Flatten each portion into discs, wrap them tightly in plastic wrap, and refrigerate for at least an hour (or ideally longer). Chilling is key here—it keeps your cookies from spreading too much while baking.
Step 6: Preheat Oven and Prepare Baking Sheets
Once your dough has chilled, preheat your oven to 375°F (190°C). Line several baking sheets with parchment paper or silicone mats—this will help prevent sticking during baking.
Step 7: Roll and Cut Cookies
On a lightly floured surface, roll out one disc of chilled dough to about ¼-inch thickness. Use Halloween-themed cookie cutters to cut out fun shapes! Transfer them gently onto prepared baking sheets while leaving about an inch between each cookie.
Step 8: Bake Cookies
Bake your cookies for about 8-10 minutes or until their edges are lightly golden. Keep an eye on them; baking times can vary based on size.
Step 9: Cool Completely
After removing them from the oven, let them cool on the baking sheets for about five minutes before transferring them to a wire rack. Allow them to cool completely—this usually takes around one to two hours—before decorating.
Step 10: Prepare Frosting
In a small bowl, combine your store-bought white frosting with five drops of neon green gel food coloring. Mix thoroughly until you achieve a uniform green color—feel free to add more coloring if you’d like!
Step 11: Decorate Cookies
Spread an even layer of green frosting onto each cooled cookie. While still wet, arrange orange, green, and purple M&M candies on top to create spooky designs!
Step 12: Final Setting
Let your decorated cookies sit uncovered for at least 30-60 minutes until the frosting has set properly before serving or storing them away. This helps prevent any smudging when handling!
Enjoy these delightful Halloween Cookies at any gathering or simply as a sweet treat at home!
Pro Tips for Making Halloween Cookies
Baking these Halloween cookies can be a delightful experience, especially with a few handy tips to ensure your cookies turn out perfectly!
-
Chill the Dough: Allowing the dough to chill for at least 1 hour helps prevent cookies from spreading too much during baking. This means your fun shapes will hold their form and look spooktacular!
-
Use Parchment Paper: Lining your baking sheets with parchment paper or silicone mats not only prevents sticking but also ensures even baking. It makes cleanup a breeze, too!
-
Don’t Overbake: Keep an eye on your cookies and take them out when the edges are lightly golden. They’ll continue to firm up as they cool, giving you that perfect soft center.
-
Experiment with Colors: While this recipe features neon green frosting, feel free to get creative! Using different colors of frosting can make your cookie display even more festive and fun.
-
Decorate with Imagination: Let your creativity shine by arranging M&M candies into spooky faces or patterns. The more personal flair you add, the more memorable these treats will be at your Halloween celebration!
How to Serve Halloween Cookies
Presenting your Halloween cookies in an enticing way can take the festive spirit to another level! Here are some ideas to make them shine on any table.
Garnishes
- Sprinkles: Add a sprinkle of edible glitter or Halloween-themed sprinkles on top of the frosting for an extra touch of whimsy.
- Candy Corn: Place a few pieces of candy corn around each cookie on the serving platter for a colorful and seasonal touch.
Side Dishes
- Hot Apple Cider: This warm, spiced drink pairs perfectly with sweet cookies and adds a cozy feeling to your gathering.
- Pumpkin Spice Cupcakes: Lightly frosted pumpkin spice cupcakes complement the chocolate flavor of the cookies while keeping with the Halloween theme.
- Caramel Dipped Apples: A great crunchy contrast, these sweet treats offer a healthy option that balances out the sugar rush from the cookies.
- Cheese Plate: A selection of cheeses paired with crackers can provide a savory contrast that guests will appreciate amidst all the sweetness.
With these serving suggestions, your Halloween cookie spread will be nothing short of enchanting! Enjoy baking and sharing these delightful treats with friends and family!
Make Ahead and Storage
These Halloween Cookies are not just fun to make, but they’re also perfect for meal prep! You can easily prepare the dough in advance, chill it, and bake whenever you’re ready. Plus, they store beautifully, making them a great addition to any festive gathering!
Storing Leftovers
- Store cooled cookies in an airtight container at room temperature.
- They will stay fresh for up to one week.
- For best results, place parchment paper between layers of cookies to prevent sticking.
Freezing
- Freeze undecorated cookies by placing them in a single layer on a baking sheet and freezing until solid.
- Once frozen, transfer them to an airtight container or freezer bag.
- Decorated cookies can also be frozen; just ensure the frosting is fully set before packaging. They can be frozen for up to three months.
Reheating
- If you’d like to enjoy warm cookies, preheat your oven to 350°F (175°C).
- Place cookies on a baking sheet and heat for about 5-7 minutes until warmed through.
- Avoid reheating decorated cookies as this may melt the frosting.
FAQs
Here are some common questions that might help you while making these delightful Halloween Cookies!
Can I make Halloween Cookies ahead of time?
Absolutely! You can prepare the dough ahead of time and refrigerate it. Chilling not only helps with rolling out the dough but adds extra flavor as well.
What are some ideas for decorating Halloween Cookies?
Feel free to get creative! Use vibrant frostings, sprinkles, or even edible glitter. The idea is to embrace the spooky spirit—let your imagination run wild!
How do I ensure my Halloween Cookies don’t spread too much when baking?
Chilling the cookie dough is key! Make sure to refrigerate it for at least one hour before rolling it out. This helps maintain their shape during baking.
Can I use different colors for frosting on my Halloween Cookies?
Yes, definitely! While this recipe features green frosting, you can use any color gel food coloring to match your Halloween theme—think orange, purple, or even black!
How long do Halloween Cookies last after decorating?
Once decorated and allowed to set properly, these cookies can last up to one week when stored in an airtight container at room temperature.
Final Thoughts
I hope you have a blast making these Halloween Cookies with your family and friends! They capture all the fun of the holiday while being deliciously chocolatey and totally customizable. Whether you’re hosting a spooky party or just enjoying a cozy evening at home, these cookies are sure to bring smiles all around. Happy baking!
Halloween Cookies
- Prep Time: 30 minutes
- Cook Time: 10 minutes
- Total Time: 40 minutes
- Category: Main
- Method: Cooking
- Cuisine: International
Ingredients
- 1 cup unsalted butter, softened
- 3/4 cup granulated sugar
- 2/3 cup packed brown sugar
- 2 large eggs
- 1 tsp vanilla extract
- 2 1/4 cups all-purpose flour
- 2/3 cup unsweetened cocoa powder
- 1 tsp baking soda
- 1/4 tsp salt
- 16 oz white frosting (store-bought)
- Neon green gel food coloring
- M&M candies (orange, green, and purple)
- Instructions for Preparation:
Instructions
- In a bowl, whisk together flour, cocoa powder, baking soda, and salt.
- In a separate bowl, cream the butter and sugars until fluffy. Add eggs one at a time along with vanilla.
- Gradually combine dry ingredients into wet ingredients until no flour streaks remain.
- Chill dough for at least an hour before rolling out to cut shapes.
- Preheat oven to 375°F (190°C) and bake shaped cookies for 8-10 minutes.
- Cool completely before decorating with green frosting and M&Ms.
- Helpful Notes:
Nutrition
- Serving Size: 1 cookie (30g)
- Calories: 150
- Sugar: 10g
- Sodium: 70mg
- Fat: 7g
- Saturated Fat: 4g
- Unsaturated Fat: 2g
- Trans Fat: 0g
- Carbohydrates: 20g
- Fiber: <1g
- Protein: 2g
- Cholesterol: 20mg


Leave a Comment