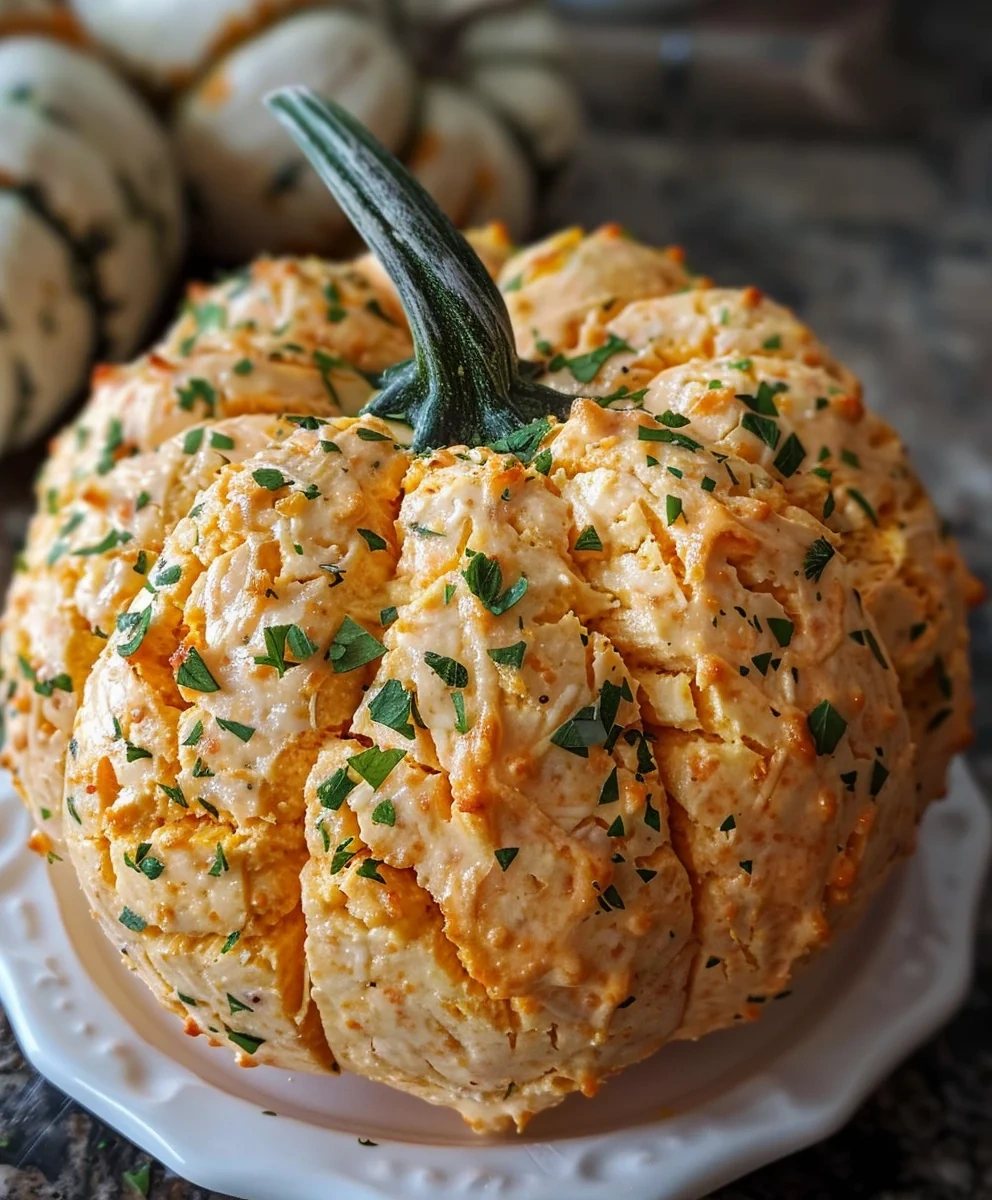
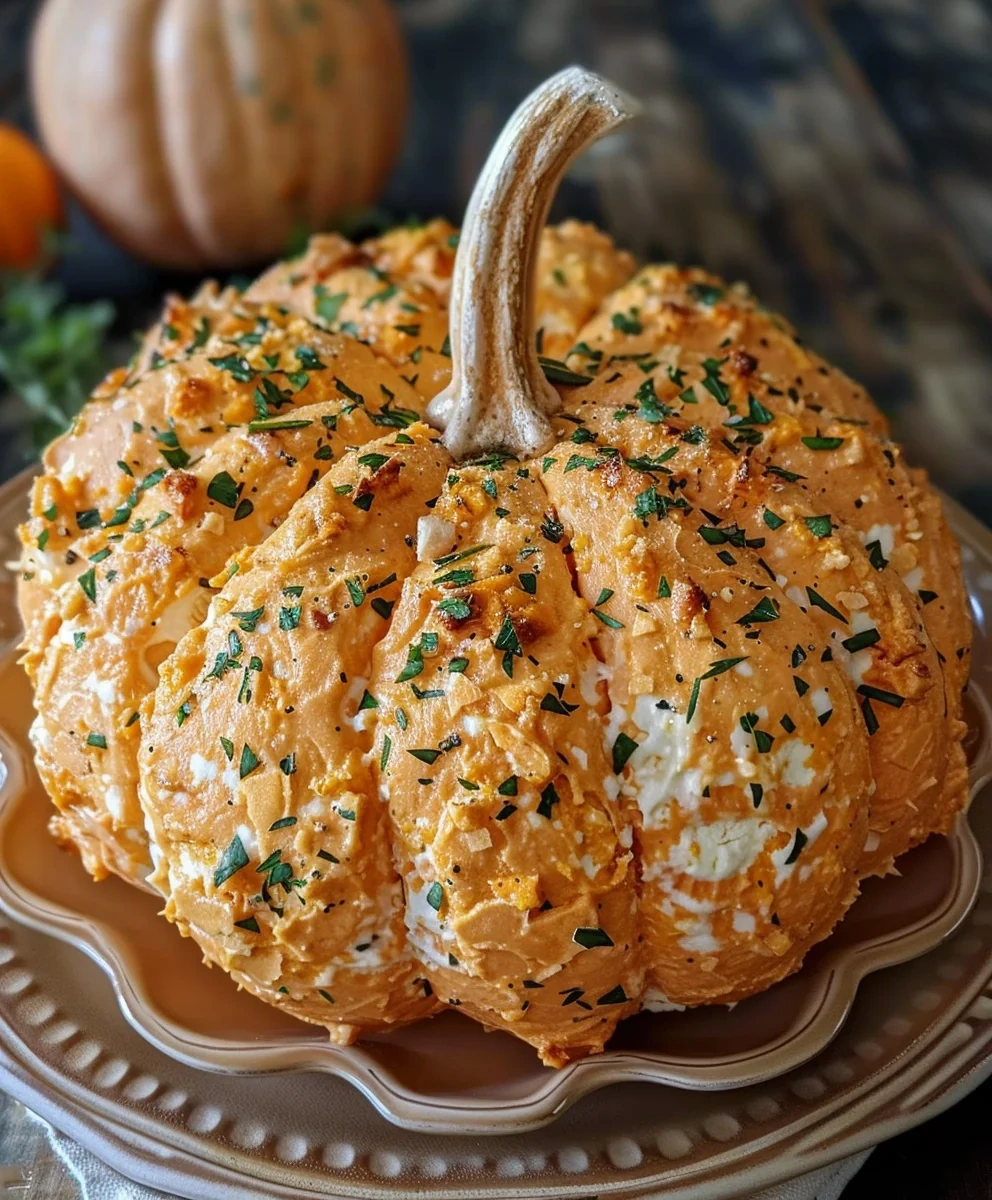
If you’re looking for a fun and festive way to celebrate the fall season, you’ve found it! This Pumpkin Shaped Cheese Ball Recipe is not just delicious; it’s a show-stopper that will impress your family and friends at any gathering. With its vibrant orange hue and charming pretzel stem, this cheese ball brings a delightful twist to traditional appetizers. Perfect for cozy family nights, holiday parties, or even just a treat for yourself, it’s sure to become a favorite.
Gathering around this savory centerpiece is about more than just taste—it’s about the smiles and laughter that come with sharing good food. So let’s roll up our sleeves and dive into this tasty adventure!
Why You’ll Love This Recipe
- Easy to Make: With simple steps and no baking required, you’ll whip this up in no time!
- Family-Friendly: Kids love to help shape the cheese ball and decorate it with the pretzel stem.
- Make-Ahead Convenience: Prepare it the night before, so you can enjoy more time with your guests.
- Delicious Flavor: The creamy, cheesy goodness with a hint of spice will have everyone coming back for seconds.
- Festive Presentation: Its adorable pumpkin shape adds a fun touch to any autumn table setting.
Ingredients You’ll Need
This recipe uses simple, wholesome ingredients that come together beautifully. You’ll love how easy it is to gather everything you need for this delightful pumpkin-shaped creation.
For the Cheese Ball
- 16 oz cream cheese, full-fat, softened
- 2 cups shredded cheddar cheese
- 1/4 cup finely chopped green onions (white and light green parts)
- 2 tablespoons mayonnaise, full-fat
- 1 tablespoon Worcestershire sauce
- 1 teaspoon garlic powder
- 1/4 teaspoon onion powder
- 1/2 teaspoon smoked paprika (for mixture), plus 1/2 teaspoon for coating
- 1/4 teaspoon cayenne pepper (optional)
- Salt and freshly ground black pepper, to taste
For the Coating
- 1 1/2 cups finely crushed cheese crackers (e.g., Cheez-Its or Goldfish)
- 1 pretzel stick or small celery stalk (for stem)
- A few fresh parsley sprigs or fresh rosemary sprigs (for garnish)
- Plastic wrap
- Twine or rubber bands
Variations
One of the best parts of this recipe is its flexibility! Feel free to get creative and make it your own with these variations:
- Add Herbs: Mix in some fresh herbs like dill or chives for an extra flavor boost.
- Spice It Up: Swap out the smoked paprika for chipotle powder if you love a bit of heat.
- Different Cheeses: Try using pepper jack cheese for a spicy twist or cream cheese flavored with herbs.
- Nut Coating: Roll the finished cheese ball in finely chopped nuts instead of cracker crumbs for added crunch.
How to Make Pumpkin Shaped Cheese Ball Recipe
Step 1: Soften Your Cream Cheese
Ensure your cream cheese is genuinely softened to room temperature. This is crucial for creating a smooth mixture. If you’re in a hurry, you can carefully microwave it on very low power for 15-20 seconds. Just be careful not to melt it!
Step 2: Combine Ingredients
In a large mixing bowl, combine your softened cream cheese with mayonnaise, Worcestershire sauce, garlic powder, onion powder, and smoked paprika. If you’re feeling adventurous, add in cayenne pepper! Using an electric mixer, beat everything together on medium speed until smooth—about 2-3 minutes. Scraping down the sides of the bowl ensures everything gets mixed evenly.
Step 3: Fold in Cheddar
Now it’s time to add in those delicious flavors! Switch to a sturdy spatula or wooden spoon and gently fold in shredded cheddar cheese and chopped green onions until fully combined. This step gives your cheese ball its rich texture.
Step 4: Season It Up
Take a moment to taste your mixture. Add salt and freshly ground black pepper according to your preference. Remember that you’ll coat it with salty crackers later!
Step 5: Shape Your Cheese Ball
Lay out a large piece of plastic wrap. Scrape your mixture onto its center. Gather the edges around it loosely and start molding it into a rough ball shape through the wrap. Pull tighter around it as you go—this helps create a nice sphere.
Step 6: Create Pumpkin Ridges
Using kitchen twine or unwaxed dental floss, create those iconic pumpkin ridges! Lay the twine under your wrapped ball and pull tightly across the top—rotate and repeat until you’ve got those lovely indentations.
Step 7: Chill Time!
Place your wrapped cheese ball into the refrigerator for at least 2-4 hours—or better yet, overnight! This chilling time lets all those flavors meld together beautifully while firming up its shape.
Step 8: Prepare Cracker Coating
In a shallow bowl or pie plate, mix crushed cheese crackers with additional smoked paprika. This will give your coating color and flavor that complements the cheese ball perfectly!
Step 9: Roll It Up
Once thoroughly chilled and firm, carefully unwrap your cheese ball from its plastic wrap. Gently roll it in the cracker mixture until every inch is covered—especially pressing into those delightful ridges!
Step 10: Serve With Style
Transfer your beautifully coated pumpkin-shaped cheese ball onto your serving platter. Press one pretzel stick into the top center as its cute little “stem.” To finish off, arrange some parsley or rosemary sprigs around the base like leafy vines.
Get ready to serve this charming appetizer alongside assorted crackers, crunchy pita chips, toasted baguette slices, or fresh veggie sticks! Enjoy this show-stopping addition to your table!
Pro Tips for Making Pumpkin Shaped Cheese Ball Recipe
Creating a stunning Pumpkin Shaped Cheese Ball is easier than you might think with these handy tips!
-
Ensure cream cheese is soft: Starting with room temperature cream cheese makes for a smoother, creamier mixture that blends effortlessly with other ingredients, ensuring an absolutely delightful texture.
-
Don’t skip the chilling time: Allowing the cheese ball to chill for at least 2-4 hours (or overnight) is crucial. It helps the flavors meld beautifully and ensures the ball holds its shape when you serve it.
-
Press the cracker coating firmly: When rolling the cheese ball in the crushed cracker mixture, press down gently but firmly. This ensures that every surface is well coated, adding flavor and a lovely crunch.
-
Use fresh herbs for garnish: Adding fresh parsley or rosemary not only enhances the visual appeal but also contributes aromatic flavors that complement the cheese ball beautifully.
-
Experiment with sides: Serving your pumpkin cheese ball with a variety of sides can elevate your appetizer spread. Think outside the box and include colorful veggie sticks or artisan crackers for a delightful presentation.
How to Serve Pumpkin Shaped Cheese Ball Recipe
Presenting your Pumpkin Shaped Cheese Ball in an inviting way can make all the difference! Here are some creative ideas to make it shine on your table.
Garnishes
- Fresh parsley sprigs: These add a pop of color and freshness while enhancing the overall look of your presentation.
- Small rosemary sprigs: Not only do they resemble vines, but they also impart a subtle aroma that elevates your dish’s fragrance.
Side Dishes
- Assorted crackers: A mix of textures and flavors—from buttery to whole grain—provides delightful options for scooping up your cheese ball.
- Crunchy pita chips: Their crispness pairs wonderfully with creamy dips, making them a perfect companion.
- Toasted baguette slices: A warm, toasted baguette adds an elegant touch while offering a sturdy base for spreading.
- Fresh vegetable sticks: Carrot, cucumber, and bell pepper slices not only add color but also provide a refreshing crunch that balances well with the rich flavors of the cheese ball.
With these serving suggestions and pro tips, you’re ready to impress! Enjoy making this festive centerpiece that’s sure to be the talk of your autumn gatherings.
Make Ahead and Storage
This Pumpkin Shaped Cheese Ball is perfect for meal prep! You can make it ahead of time, allowing the flavors to meld beautifully, making your entertaining effortless. Here’s how to properly store it for the best taste and freshness.
Storing Leftovers
- Keep any leftover cheese ball in an airtight container in the refrigerator.
- It should stay fresh for up to 5 days, although it’s best enjoyed within 2-3 days for optimal flavor.
- If you have a portion left over, consider re-shaping it back into a ball before storing.
Freezing
- This cheese ball can be frozen for longer storage.
- Wrap it tightly in plastic wrap and then place it in a freezer-safe bag or container.
- It can be frozen for up to 3 months. Thaw in the refrigerator overnight before serving.
Reheating
- There’s no need to heat this cheese ball; it’s served cold and creamy!
- Just allow it to sit at room temperature for about 30 minutes before serving to soften slightly if it has been refrigerated.
FAQs
Here are some common questions about the Pumpkin Shaped Cheese Ball Recipe that might help you out!
Can I make the Pumpkin Shaped Cheese Ball Recipe ahead of time?
Absolutely! This recipe is fantastic for making ahead. Prepare it a day or two in advance and keep it chilled until your gathering.
How long does the Pumpkin Shaped Cheese Ball last?
When stored properly in an airtight container, your Pumpkin Shaped Cheese Ball can last up to 5 days in the refrigerator, although it’s best enjoyed within 2-3 days.
What can I use instead of cream cheese in this recipe?
For a lighter option, you could substitute with a vegan cream cheese alternative or Greek yogurt. However, keep in mind that this will change the flavor and texture slightly.
Can I customize the spices in my Pumpkin Shaped Cheese Ball?
Definitely! Feel free to adjust the seasonings according to your taste. Add herbs, spices, or even some diced jalapeños if you like a kick!
What types of crackers pair well with this cheese ball?
You can’t go wrong with various crackers! Serve with crunchy pita chips, toasted baguette slices, or an assortment of savory crackers for dipping.
Final Thoughts
This Pumpkin Shaped Cheese Ball is not just an appetizer; it’s a festive centerpiece that adds warmth and charm to any gathering. I hope you enjoy making this delightful treat as much as I do! It’s perfect for sharing with friends and family during those cozy autumn evenings. Get ready to impress your guests and indulge in deliciousness—happy cooking!
Pumpkin Shaped Cheese Ball Recipe
- Category: Main
- Method: Cooking
- Cuisine: International
Ingredients
- 16 oz cream cheese (softened)
- 2 cups shredded cheddar cheese
- 1/4 cup finely chopped green onions
- 2 tablespoons mayonnaise
- 1 tablespoon Worcestershire sauce
- 1 teaspoon garlic powder
- 1/2 teaspoon smoked paprika (plus more for coating)
- Salt and black pepper to taste
- 1 1/2 cups finely crushed cheese crackers (like Cheez-Its)
- 1 pretzel stick or small celery stalk (for the stem)
- Preparation Instructions:
Instructions
- Soften the cream cheese until room temperature.
- In a bowl, mix cream cheese with mayonnaise, Worcestershire sauce, garlic powder, smoked paprika, salt, and pepper until smooth.
- Gently fold in cheddar cheese and green onions.
- Shape the mixture into a ball using plastic wrap; create pumpkin ridges with kitchen twine.
- Chill for at least 2-4 hours or overnight.
- Roll the chilled ball in crushed crackers mixed with smoked paprika until coated.
- Insert a pretzel stick for the stem and serve with assorted crackers and veggies.
- Helpful Notes:
Nutrition
- Serving Size: 28g
- Calories: 102
- Sugar: 0g
- Sodium: 185mg
- Fat: 8g
- Saturated Fat: 4g
- Unsaturated Fat: 3g
- Trans Fat: 0g
- Carbohydrates: 6g
- Fiber: 0g
- Protein: 5g
- Cholesterol: 20mg

Leave a Comment